How To Make Prints At Home. I wish i could have shown more detail when i edited the image in photoshop. Place the print on the front of the canvas panel. You can also add drawings or text to your photogram by using mylar (a clear plastic sheet) or. Sketch out an image or design onto a linoleum block with a pencil. You can even make tiny prints out of film negatives.
Press file, select print settings, tap custom size, and then enter the height and width that you would like the image. Using lightroom's plugin feature, all you need to do is go to 'plugin extras', select print studio pro and you're ready to start the printing process without needing to export the image or adjust colour space settings. You build a screen and stencil, then push ink through the mesh and onto your shirt, paper, or object. The long awaited print tutorial is finally here, yay!! Being able to screen print at home enables you to create unique pieces of clothing and other objects, and you can replicate the design on as many objects you want by using the same screen.
DIY : How To Make A Temporary Tattoo at Home Using Inkjet ... from i.ytimg.com There are inexpensive solutions available which can be achieved at home, although an artists' needs will vary depending on where the prints will be seen, whether they might be part of an exhibition of work or a portfolio, or given to. Printing your invitation is no exception. You can print your beautiful digital art right at home if you want to display or sell it. You build a screen and stencil, then push ink through the mesh and onto your shirt, paper, or object. If you have cricut cutting machine, this is your part. First, choose your fabric which should be thin enough to go through a home printer. Lighter coloured white or cream fabrics are best too. If diy prints aren't your thing… use canvashq.
How to make vinyl car decals with cricut.
Open the file that contains the text or image that you want to print. Printing your invitation is no exception. Lighter coloured white or cream fabrics are best too. First, choose your fabric which should be thin enough to go through a home printer. Take a step back and look at the amazing job you've just done! For more of b.zedan's work, take a look at her website and flickr photostream. It's important to export your art in the highest quality to make sure you don't lose any detail. Export it as a jpeg or tif file in the highest resolution you can. Select file> open and choose the image you wish to work on. If diy prints aren't your thing… use canvashq. After printing photos, make unique framed prints, canvas prints, or personalized desktop. The bigger the negative, the bigger the print. You will need a few supplies to make this one but they are inexpensive.
Select the type of photo product you want and when you need it by, and then sit back while we prepare your prints for you. It can also be time consuming, and with the holidays just around the corner, you may want to get some photo prints the easy way. Print at home invitations that look like expert quality. Using lightroom's plugin feature, all you need to do is go to 'plugin extras', select print studio pro and you're ready to start the printing process without needing to export the image or adjust colour space settings. Making your own shirt designs at home is easier now than it's ever been!
Paper Making at Home - YouTube from i.ytimg.com Then, use a carving knife or a carving tool from a craft supply store to whittle away the block until only your design is left. Printing on fabric might sound like something only pro's can do! If you have cricut cutting machine, this is your part. Select the size prints you prefer, if relevant, and whether you prefer a glossy or matte finish. Take a step back and look at the amazing job you've just done! This video is sponsored by skillshare sign up via this link will get two months of free skillshare premium: That would mean proper alignment and good ink levels. Pull in both directions until one side is coated.
There are inexpensive solutions available which can be achieved at home, although an artists' needs will vary depending on where the prints will be seen, whether they might be part of an exhibition of work or a portfolio, or given to.
You can print your beautiful digital art right at home if you want to display or sell it. If diy prints aren't your thing… use canvashq. This diy will guide you through the steps to print shirts at home with an iron and printer. I understand that learning how to print photos isn't for everyone. An easy alternative is to print using print studio pro. Select the size prints you prefer, if relevant, and whether you prefer a glossy or matte finish. Printing your invitation is no exception. Printing on fabric might sound like something only pro's can do! First, choose your fabric which should be thin enough to go through a home printer. You can also add drawings or text to your photogram by using mylar (a clear plastic sheet) or. To create a high quality giclée print, several conditions must be met concerning the printer, the ink, the surface, and the resolution of the print. I wish i could have shown more detail when i edited the image in photoshop. Select file> open and choose the image you wish to work on.
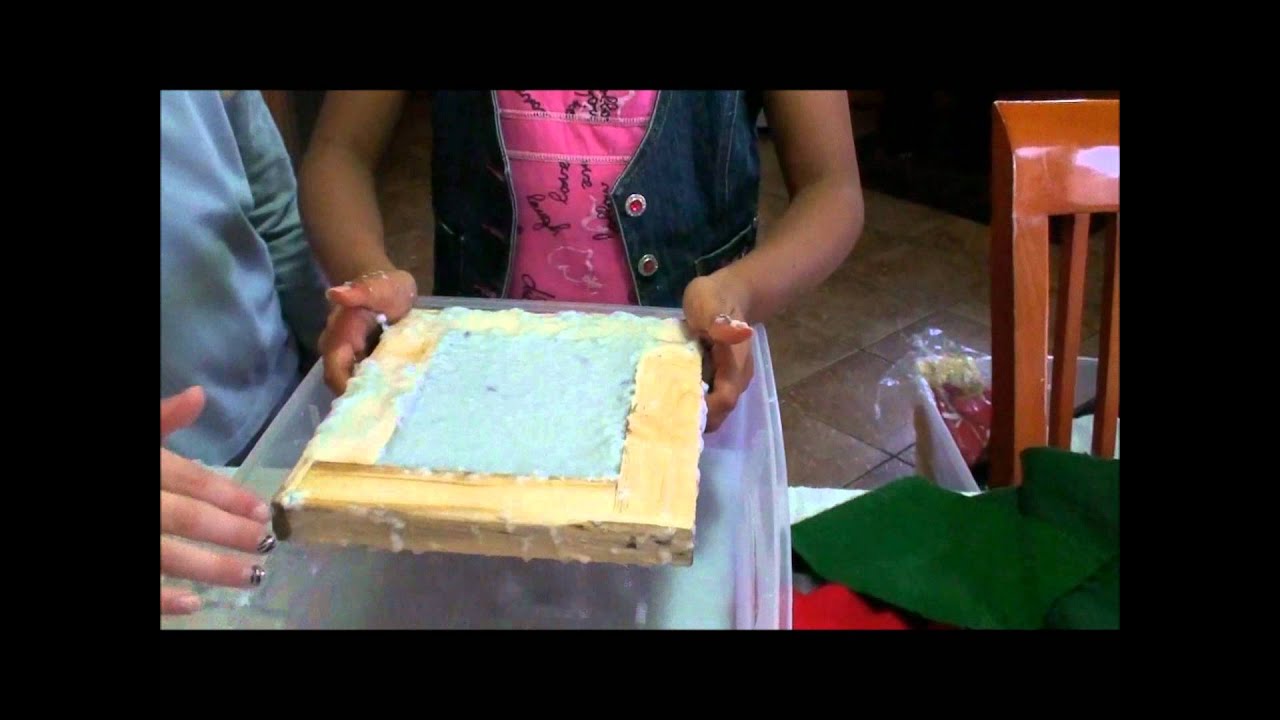
An easy alternative is to print using print studio pro. If you're printing it bigger than 13 by 19 inches, increase the dpi to 300. How to make vinyl car decals with cricut. The supplies you'll need for the job include: Method 1 building the screen and frame
How To Make Your Own Screen Print T-Shirts - Modern ... from homeschoolingindetroit.com Press file, select print settings, tap custom size, and then enter the height and width that you would like the image. Place the print on the front of the canvas panel. Grab that squeegee and use it to make a single smooth movement across down the screen as you exert strong pressure. If you're printing it bigger than 13 by 19 inches, increase the dpi to 300. Firmly press your decal to make it stick well and rub it all over to make sure every little piece gets covered. It can also be time consuming, and with the holidays just around the corner, you may want to get some photo prints the easy way. Always use sublimation paper in a sublimation printer, as regular paper won't allow the ink to transfer onto your mug. Export it as a jpeg or tif file in the highest resolution you can.
Sketch out an image or design onto a linoleum block with a pencil.
You can also add drawings or text to your photogram by using mylar (a clear plastic sheet) or. You'll need to develop, stop, and fix the print before giving it a bath in water. Grab that squeegee and use it to make a single smooth movement across down the screen as you exert strong pressure. This diy will guide you through the steps to print shirts at home with an iron and printer. How to make vinyl car decals with cricut. Place the print on the front of the canvas panel. An easy alternative is to print using print studio pro. These would make a great affordable gift! Working on top of discardable paper or a drop cloth, pour a generous amount of photo emulsion along one side the screen. For this, i recommend canvashq. Lighter coloured white or cream fabrics are best too. The test print allows you to pick the best exposure time for creating your actual final print. Then, use a carving knife or a carving tool from a craft supply store to whittle away the block until only your design is left.


Posting Komentar
0 Komentar